|
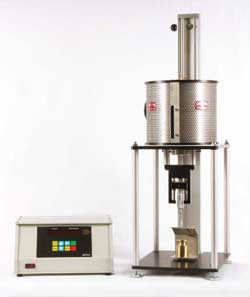
The Orton Model
SP-5A-DAS system is well suited for glasses that for
one reason or another are not adaptable for flame working, or
for applications where thermal expansion or effective length
corrections (common to the fiber elongation method) are
eliminated. The Orton Model SP-5A-DAS has been designed to
automatically monitor the deformation of a 3-point loaded
glass beam according to the ASTM C-598 method. Changes in the
annealing and strain point temperatures can be used as an
indication of changes in batch chemistry from raw material
changes or batching errors.
Automatic Annealing and Strain Point
Determination
 It takes 20 minutes to measure the
Annealing and Strain Points of a glass rod or bar. It’s
simple. After the sample beam (rod or bar) is prepared, the
operator simply places the beam into the furnace, enters the
sample dimensions into the Orton on board computer, applies
the weight, pushes the START button, and walks away. The
system does the rest. The operator is free to perform other
tasks. Twenty minutes later, the operator returns and reads
the annealing point temperature on the display panel. It's
that easy. The SP-5A-DAS automatically calculates the rate of
deformation and displays the annealing point temperature which
eliminates operator differences, judgements, and errors. If an
independent computer system is connected to the SP-5A-DAS,
both the annealing and strain point temperatures are
calculated and displyed on the computer's monitor. The system
automatically measures and records the rate of deformation and
applies non-arbitrary mathematical algorithms to extrapolate
the strain point temperature so operator differences,
interpretations, judgments, and errors are eliminated. The
Model SP-5A-DAS is a FAST, EASY, ACCURATE, RELIABLE, and
REPRODUCIBLE method for QC checks on batch chemistry changes.
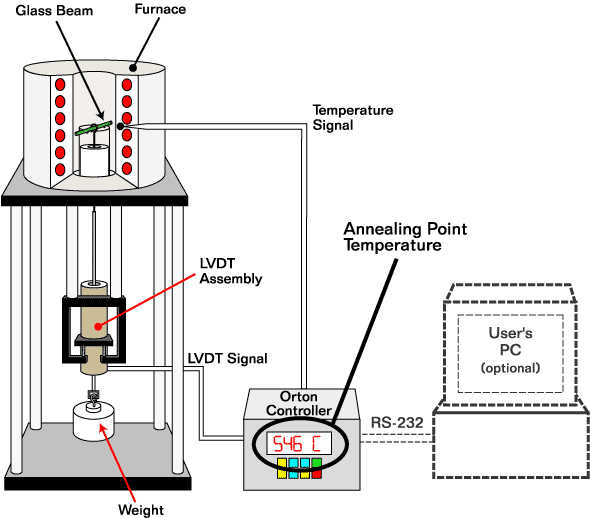
This system is comprised of the ASTM specified furnace to heat
the sample beam, the Orton PID controller to operate the
furnace according to the ASTM C598 thermal cycle, 2-point
sample support system with midpoint sample load rod and
weight, an LVDT system to continuously monitor the beam
deformation, the Orton on board computer with internal logic
to determine the annealing point, digital display panel for
displaying the annealing point temperature, and software for
an independent computer (provided by the purchaser).
Operation
 The
system is initially heated to an equilibrium soak temperature
25°C below the expected annealing point, and waits for the
next test. The operator enters the beam dimensions into the on
board computer, positions the beam on the sample support,
applies the midpoint load rod, and adds the weight. As soon as
the START button is pushed, the Orton controller heats the
furnace at 5ºC per minute, and the on board computer captures
the temperature and LVDT signals of the deforming beam and
calculates the beam’s deformation rate. Once the deformation
rate exceeds a deformation rate corresponding to a viscosity
of Log 12 P (a constant that is automatically calculated by
the on board computer using the operator inputted beam
dimensions and pre-programmed ASTM C598 equations), the Orton
controller cools the furnace at 4°C per minute. While the
furnace is cooling, the temperature and LVDT signals are
captured by the controller’s on board computer for storage.
The test is automatically concluded when the temperature falls
10°C below the annealing point. The annealing point is the
temperature at which an ASTM C598 specific deformation rate
occurs. This rate is calculated by the on board computer using
the operator inputted beam dimensions and pre-programmed ASTM
C598 equations, and is displayed on the console display until
the system is reset. The furnace automatically cools to the
soak temperature in about 15 minutes, and is ready for the
next test. The on board computer can store data for up to 10
tests. The
system is initially heated to an equilibrium soak temperature
25°C below the expected annealing point, and waits for the
next test. The operator enters the beam dimensions into the on
board computer, positions the beam on the sample support,
applies the midpoint load rod, and adds the weight. As soon as
the START button is pushed, the Orton controller heats the
furnace at 5ºC per minute, and the on board computer captures
the temperature and LVDT signals of the deforming beam and
calculates the beam’s deformation rate. Once the deformation
rate exceeds a deformation rate corresponding to a viscosity
of Log 12 P (a constant that is automatically calculated by
the on board computer using the operator inputted beam
dimensions and pre-programmed ASTM C598 equations), the Orton
controller cools the furnace at 4°C per minute. While the
furnace is cooling, the temperature and LVDT signals are
captured by the controller’s on board computer for storage.
The test is automatically concluded when the temperature falls
10°C below the annealing point. The annealing point is the
temperature at which an ASTM C598 specific deformation rate
occurs. This rate is calculated by the on board computer using
the operator inputted beam dimensions and pre-programmed ASTM
C598 equations, and is displayed on the console display until
the system is reset. The furnace automatically cools to the
soak temperature in about 15 minutes, and is ready for the
next test. The on board computer can store data for up to 10
tests.
If desired, a separate, independent computer system (not
included) can be connected to the Orton controller console via
a RS232 port for real time monitoring and analysis. During the
test the beam deformation rate, time, and temperature are
displayed on the monitor and stored on the hard drive in a
text file. At the conclusion of the test, the software
automatically and immediately calculates the annealing point
temperature at which the ASTM C598 specific deformation rate
occurs. This rate is calculated using the operator inputted
beam dimensions and pre-programmed ASTM C598 equations. The
software also automatically and immediately calculates the
extrapolated strain point temperature, which is the
temperature where the deformation rate is 0.0316 times the
annealing deformation rate, according to the ASTM C598
algorithms.
Or, if preferred, a separate, independent computer system (not
included) can be connected to the Orton controller console via
a RS232 port after the test is concluded. The data stored by
the Orton on board computer is transferred to the independent
computer’s hard drive in text file format for later
independent review, analysis, or permanent storage.
Model SP-5A-DAS Specifications
| Sample
Length |
50 mm (other
lengths avail.) |
| Sample Cross Section |
2.5 - 5 mm |
| Sample Support |
Fused Quartz |
| Sample Load Device |
Fused Quartz |
| Maximum Temperature |
1,000°C |
| Heating Element |
Kanthal A-1 |
| Temperature Control
System |
PID - Automatic |
| Elongation Tracking
System |
LVDT |
| Data Acquisition &
Display |
Automatic |
| Power Requirements |
120 VAC, 10 amp, 50/60 Hz
(240 VAC available) |
| Measuring Unit
Dimensions |
12” W x 14” D x 33”
T (305 x 355 x 840 mm) |
| Controller Dimensions |
13” W x 12” D x 7”
T (330 x 305 x 180 mm) |
*Descriptions
& specifications are subject to change without notice
|